How to install CC Expanding sealer (standard and adhesive)
Video demonstrating installation of window with adhesive product and standard product with a needle gun.
Installation of CC window sealer – instruction guide working with a needle gun
Good to know before you start:
– The prerequisite is that the side pieces or the frame are made of a material where it is possible to apply CC expanding sealer with a needle gun.
– Should there be nothing to attach the drive to, apply CC expanding sealer to the window frame. Then remember to bring the CC sealer up a bit above the window so that there are no cold drafts in the corners.
How to mount CC expanding sealer:
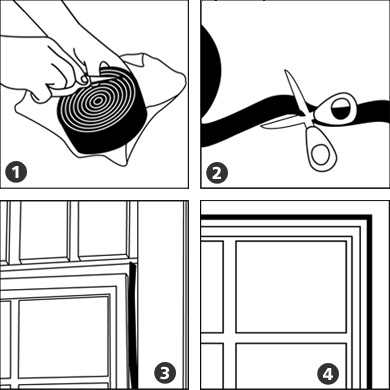
- Carefully open the package with a knife or scissors to release the vacuum.
- Pull out the gear to the desired length to be used (ie as much as the cavity to be sealed).
- Mount the CC expanding sealer to the piece in the wall with a needle gun (note: no staples).
- Place the gear over the window blocks and fasten the gear.
- Cut or cut the sealer at the window blocks so that the block is free.
- Cut CC expanding sealer at all corners so sash can expand from two sides.
- Mount the window.
- Mount the jamb directly through the CC expanding sealer if desired.
- Now it’s just a matter of waiting for the cc expanding sealer to expand! The expansion time is 1-3 hours at room temperature (21-21°C), at colder temperatures a longer expansion time applies.
Remember that: The drive replaces other types of window sealer such as strips of glass wool or joint foam. However, the product does not replace the inner or outer seal. According to the principle diffusion-open outside and diffusion-tight inside, the inside must therefore be made diffusion-tight with, for example, suitable sealant or tape. On the outside, weather sealing is provided by, for example, stealth strips, expanding joint tape for external use or aerated sealing with a suitable joint compound. As the CC expanding sealer has a standard width of 60 mm, it is mounted from the inside and pushed a little bit into the drive slot to make room for sealant if it is to be used.
Use a bottom strip when the standard frame has a wider width than 60 mm, and therefore the required air gap ends up in the right place, i.e. on the outside. When using diffusion-proof joint tape, CC expanding sealer can be placed flush with the inside of the frame.
– Optimal joint width for the drive strip is 5-15 mm.

According to Type Approval 01/05/98
CC expanding sealer must be protected against moisture and UV light with a cover strip made of, for example, sheet metal or sealant. The inside must be protected with a diffusion-proof joint compound or a SITAC approved tape. Should moisture get in after all, there are no living organisms in CC expanding sealer, it is completely humus-free, which means that it cannot possibly mold.